Showing posts with label craft. Show all posts

Friday, April 14, 2017

Bella BLVD | Easter Thank You...

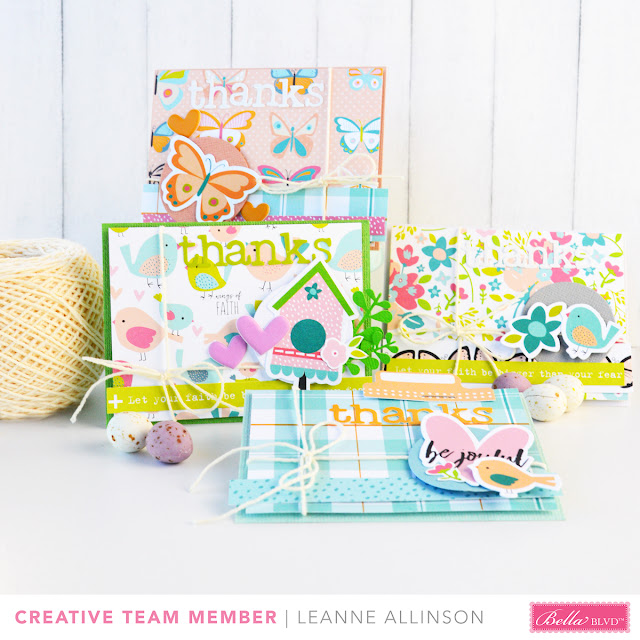
Hey Friends! I just wanted to share these 3x4 thank you cards I created last week. They're just in time for Easter! I want my friends to know how much I appreciate them. This was such a simple idea that I made them in less than an hour. 


I started with some base cardstock and grabbed the Illustrated Faith | Seed of Faith collection. I just adore the colours!

I was also drawn towards using the gorgeous Seeds of Faith paper pieces as well. Creating layers was easy by mounting them on foam dots!


Behind each cluster of paper pieces (die cuts) I added a simple 1.5" circle, punched from coordinating cardstock.


Add some twine and a few puffy heart stickers and these cards practically make themselves!! *grin*


Thanks for visiting today! I hope I've inspired you to pull out some supplies and play over the Easter weekend..x

......................................................

Supplies:

patterned paper - Illustrated Faith Seeds of Faith; cardstock - bazzill, American Crafts; embellishments - Bella Blvd Puffy Heart stickers, Illustrated Faith Seeds of Faith paper pieces; alphas - Bella Blvd Tiny Text Alphabets; other - twine, staple, foam dots.

Tuesday, February 25, 2014

Bella Blvd | Crafty Love...

Hello Friends!  Today I am sharing a LO created for Bella Blvd and the design team's Monday Challenge.  This week we had to incorporate 6 photos onto our layouts.  :)


"Crafty Love"

products used: cs - Kaiercraft; pp - Bella Blvd (max, lucky starz, family forever); alphas - Bella Blvd; other - Bella Blvd: feathers, stickers, Max paper pieces; Heidi Swapp colorshine (navy).

Sure.  At first glance I didn't meet the requirements of this challenge, right?!  Here's a closer look... *grin*


Scrapping in the smaller size often only allows me to use one or two photos per layout.. that and the fact that I do like to have a little white space on my layout somewhere! LOL!  So my simple solution was to create a mini file folder/flap/hidden space to add extra elements.  In this case it was my photos.  So instead o 6 photos on my layout I actually have 9.  phew! This challenge had me stepping outside the box somewhat!


If you would like to see how I created this LO, with a basic step by step guide to hide your own photos on a layout, please head on over to Bella Blvd.  Thanks so much for visiting...x


Thursday, March 29, 2012

52 photos...week 13 (Easter Craft activity...)

Yesterday I took the kids outside after school and we experimented with some colour.  They had no idea what I was about to create with them but they watched, intrigued, as I carefully measured amounts of vinegar and food colouring into plastic cups.  :) hee hee...


I had decided it was about time we hand dyed some hard boiled eggs.  An experiment as such, because this was our first attempt.  Ever.  It couldn't be too hard, right?!!  Messy maybe.... LOL!  But that's why we went outside!


We had fun watching how quickly the eggs changed colour... and we started with brown eggs.  Not white...  whoops!  :D


But then again... waiting for the eggs to dry was a bit too much for some of us... especially since we'd already had a big day at school!!

The recipe for this experiment was so easy to follow (and I'm sure many of you have already done this or are preparing to do this during Easter).  This is what we did.

Before the kids caught the bus to go to school in the morning, I hard boiled six eggs.  This way they knew something was happening in the afternoon when they got home from school.   Something for them to look forward to - since they have no homework this week!  hee hee... Plus after seven or eight hours in the fridge, the eggs were certainly cool enough for them to touch!!

Using an old muffin tin/tray, I placed six plastic cups upright in the tray to prevent them from being knocked over (accidentally in their excitement.... I was prepared for this possibility!!  LOL!  And nobody wants to clean up dyes from the kitchen floor - well... I didn't!).

Next I placed a teaspoon of white vinegar in each of the plastic cups.  And then added food colouring to create various colours.  We had orange, aqua, lime green, red, purple and yellow.  Although the end results with the colours may need to be adjusted with our future attempts.

After the tray was carried outside we filled the cups up with room temperature water, not all the way to the top but about 3/4 full.  The kids then chose an egg each and decided on a colour.  With plastic spoons they carefully placed their egg into the dye.


After the kids were happy with the colour of their egg, we placed them back in the egg carton to dry off.  Easy peasy... :)  So what do you think?  What are some quick and easy crafts you do at Easter?  I would love to do more of these crafts with my kids in the future and our school no longer seems to participate with an Easter Bonnet parade.  :(  If you have any ideas please share.  Thanks so much for visiting...x