Showing posts with label vellum. Show all posts

Thursday, January 29, 2015

Scraptastic Club | Pinterest Monday...

Hi Everyone! I just wanted to share  with you a layout created for Scraptastic Club Pinterest Monday.  Monique and I are up on the blog here.


 "Happy Heart"

products used: Scraptastic Club Kit - This Must Be The Place; Add on - This Must Be The Place; flair/badges - This Must Be The Place; tools - typewriter, silhouette portrait.
 
Once again I broke out my Silhouette Portrait to recreate the quote.  I positioned the words on the right side and justified the edge to allow the individual words to line up perfectly. Below the cut I placed the moon phase patterned paper from the This Must Be The Place January kit and then layered the Crate Paper Open Book | Chapters patterned paper and the yellow cardstock beneath that.


If you would like to see more details, please visit the new Scraptastic Club website.


Thanks for joining me today.


Thursday, January 22, 2015

Scraptastic Club | A - Z Challenge...

Hello Friends!  We have a fabulous challenge on the Scraptastic Club blog today and I am hoping you are all willing to play along.  The wonderfully talented Anna and I are challenging you to use the full alphabet on your layouts.  Quite a big ask perhaps, but for those of you in organisation and purging mode for the new year, this challenge is perfect for you!
 
What better way to use up some of your scrapbooking stash?  Anna's layout is simply stunning and I love the way she has incorporated journaling into her challenge process.  I have chosen a more subtle approach and dusted off my Silhouette to create an easy 3x4 alphabet card from plain white cardstock.
 
"Here"
 
products used: Scraptastic Club Kit - This Must Be The Place; Add on - This Must Be The Place; flair/badges - This Must Be The Place; tools - typewriter, silhouette portrait.
 
Like Anna, I have also used the Scraptastic Club This Must Be The Place January kit and have used the challenge this week to express the transitional phase my youngest son is going through right now.
 
 
At first glance the alphabet card really doesn't seem to be related to anything else on the page.  But for me, it represents an age where he is learning.  He is about to start his very first year at school and the process of getting into a new routine is very relevant.  Including having a space all of his own in his bedroom.
 
 
I've drawn out the beautiful teal blues and yellow colours in the kit and teamed them with a masculine grey. But to soften the entire look I've added the gorgeous vellum embellishments, including the flowers.  Also by using the reverse side of the vellum, see above, I've kept the focus of my layout on the photos and story, rather than the bright pop of colour.  It stood out on the page like a beacon shouting "Look at me!!"
 
 
Thanks for visiting here today and I hope I have inspired you to take up the challenge over at Scraptastic Club.  Good luck and I can't wait to see the layouts in the gallery!


----quick tutorial-----------------------------------------------------------------------------------------------------
 
To create your own alphabet cut file, open a new file in Silhouette and using the rounded corner rectangle, create a shape at 3" wide x 4" high. This forms your background/base card.
 
Click on the text icon and type in 'a, b, c, d, e'.  I used the Aharoni font. Resize the text to fit onto the 3x4 background shape.  Continue the same process with the following text lines: 'f - l'; 'm - p'; 'q - v'; w - z'.
 
Hold the 'shift' key and select the entire cut file.  Group all the elements together by right clicking the mouse.

Now you can send the file to your silhouette to be cut out.
-------------------------------------------------------------------------------------------------------------------------


Tuesday, June 24, 2014

Scraptastic Club | Pinterest Monday...

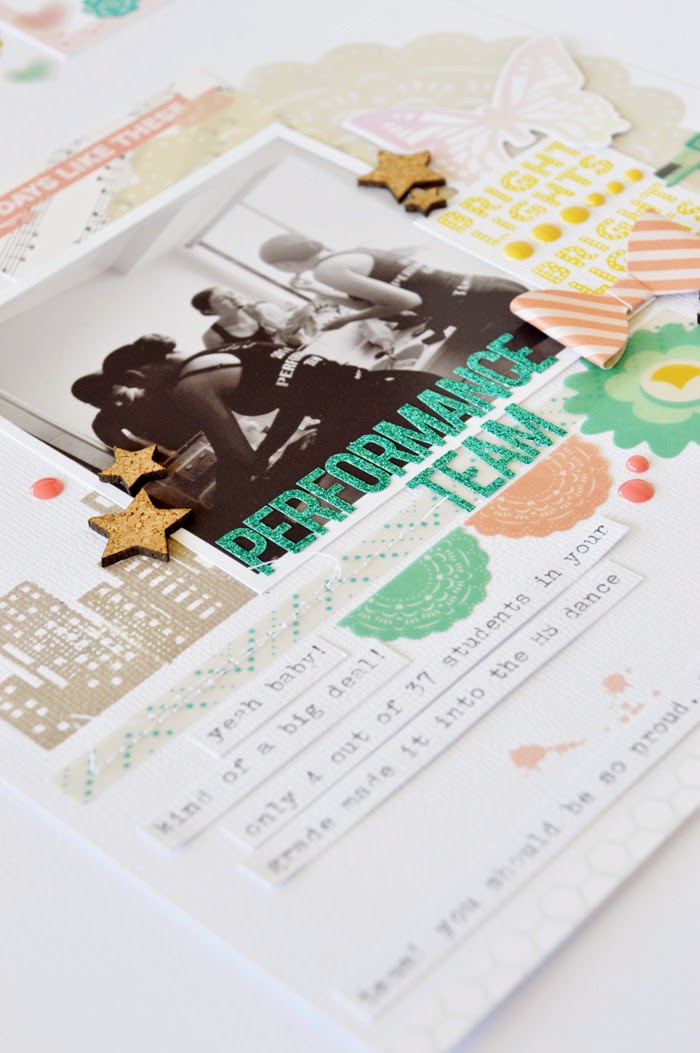
Hello wonderful friends!!  Today I am sharing with you a layout, created for Scraptastic Club and the Monday Pinterest Moodboard, put together using the 'Best Day of my Life' kit.
 
 
I've teamed up with fellow design team member, Brittany McLeod for this whimsical and ethereal Moodboard combination.
 
This is the layout I was inspired to create...
 
"Performance Team"

products used: Scraptastic Club - Best Day of my Life, add-on, stamps, cut-aparts; cs - Kaisercraft; other - colorshine (blush), ink; tools - typewriter.


Plenty of transparencies, bows, butterflies and all things girly!  *grin*


If you would like to know more about the details, please head on over to Scraptastic Club for a closer look.  Thanks for visiting..x


Wednesday, June 18, 2014

Scraptastic Club | June Kit...

Hello Friends!  Today I am sharing two of my layouts that are up on the Scraptastic Club blog today.  I was completely inspired by these wood grain and vellum frames included in the June "Best Day of My Life" kit.
 
"Lovely"

products used: Scraptastic Club Kit - June | Best Day of My Life; add on - Best Day of My Life; cs - Kaisercraft; tools - typewriter, machine stitching.


My second layout was also inspired by those frames but I used patterned paper instead... And I really adore these photos of my daughter and nephew together, that I just wanted to showcase them fully, with patterned paper mini frames of their own.

"You"

products used: Scraptastic Club Kit - June | Best Day of My Life; add on - Best Day of My Life; cs - Kaisercraft; tools - typewriter, machine stitching.


 If you get the chance, I would love to see you over at Scraptastic Club (more details and explanations found there).  Thanks for visiting...x


Friday, September 27, 2013

Bella Blvd | photo inspiration...

Hello Scrappy Friends!  Today I am sharing my last Bella Blvd project from the 2012-2013 term.  Our design team challenge was to use this photo as inspiration...


At first I was drawn to the colours!  No surprise there right?  *grin*  But then I took it a step further and decided I wanted to "make the bed" on my page.. please note the pillow placement and the layers of paper on my page! LOL!

 
 "So Blessed"

products used: cs - Kaisercraft; pp - Bella Blvd: Play Date, Christmas Countdown, Freesttyle sophisticates, Snapshots; alpha - Bella Blvd; other - Bella Blvd: designer tape, cardstock stickers, die cuts, buttons, crochet hearts; twine, seam binding, mist, vellum; tools - silhouette portrait.

I changed the quote slightly to suit my layout theme and cut it out on my silhouette portrait.  I even backed it with vellum to subtly change and soften the colour of the fun triangle patterned paper from the Play Date collection.


I have been admiring these cute double bows created from seam binding over at Jinny's blog for a little while now.  So I thought I might like to try them.  She puts together the cutest combinations of ribbon, buttons and twine!


If you would like to know more about my layout process, please visit the Bella Blvd blog.  Thanks for visiting..x